DeepDiff Tutorial: Deep Commandline
DeepDiff 5.2.1 comes with the new commandline feature!
Get sample data
Let’s start by looking at the Google Analytics Sample dataset on Kaggle.
Here is a sample query taken from paultimothymooney’s notebook
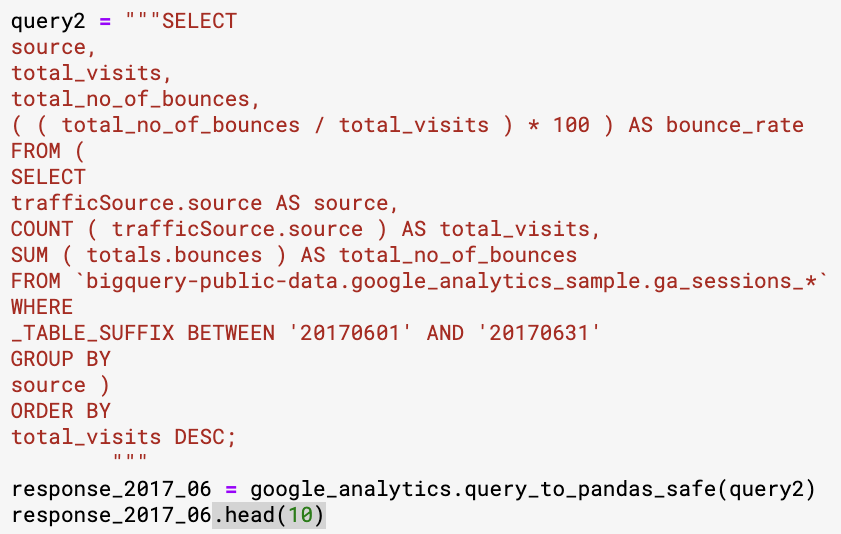
Let’s run this for a few different months in 2017:
-
2017 04
-
2017 05
-
2017 06

-
2017 07
Let’s export the output of these queries for each month into individual csv files from Kaggle.
What has changed from month to month?
We can use the deep diff command to get the difference between any 2 files.
$ deep diff google_store_bounce_rate_2017_06.csv google_store_bounce_rate_2017_07.csv{ 'values_changed': { "root[0]['bounce_rate']": { 'new_value': 51.55729166666667,
'old_value': 46.51783094609373},
"root[0]['source']": { 'new_value': 'google',
'old_value': '(direct)'},
"root[0]['total_no_of_bounces']": { 'new_value': 19798.0,
'old_value': 17440.0},
"root[0]['total_visits']": { 'new_value': 38400,
'old_value': 37491},
"root[1]['bounce_rate']": { 'new_value': 43.265798602382986,
'old_value': 52.884508297137764},
"root[1]['source']": { 'new_value': '(direct)',
'old_value': 'google'},
"root[1]['total_no_of_bounces']": { 'new_value': 8606.0,
'old_value': 9497.0},
"root[1]['total_visits']": { 'new_value': 19891,
'old_value': 17958},
"root[2]['bounce_rate']": { 'new_value': 66.72964887419303,
'old_value': 67.13819368879217},
"root[2]['total_no_of_bounces']": { 'new_value': 4238.0,
'old_value': 1234.0},
"root[2]['total_visits']": { 'new_value': 6351,
'old_value': 1838},
"root[3]['bounce_rate']": { 'new_value': 53.9553752535497,
'old_value': 57.738435179897195},
...Group by
Ok the above results are obviously not very useful. DeepDiff is comparing items line by line. Instead what we care is to compare the items based on the “source” field in the csv. We can use the new group_by
$ deep diff google_store_bounce_rate_2017_04.csv google_store_bounce_rate_2017_07.csv
--group-by source
{ 'dictionary_item_added': [root['facebook.com'], root['sites.google.com'], root['dfa']],
'dictionary_item_removed': [root['t.co'], root['yahoo'], root['reddit.com']],
'values_changed': { "root['(direct)']['bounce_rate']": { 'new_value': 43.265798602382986,
'old_value': 43.71677762295505},
"root['(direct)']['total_no_of_bounces']": { 'new_value': 8606.0,
'old_value': 8471.0},
"root['(direct)']['total_visits']": { 'new_value': 19891,
'old_value': 19377},
"root['Partners']['bounce_rate']": { 'new_value': 52.348993288590606,
'old_value': 58.888076079005124},
...exclude-regex-paths
We are only interested in the bounce rate and rank changes in the above results. How can we limit the results to only what we want? One way of doing it is to use the exclude-regex-paths
$ deep diff google_store_bounce_rate_2017_04.csv
google_store_bounce_rate_2017_07.csv --group-by source
--exclude-regex-paths total_visits --exclude-regex-paths total_no_of_bounces
{ 'dictionary_item_added': [root['dfa'], root['facebook.com'], root['sites.google.com']],
'dictionary_item_removed': [root['t.co'], root['reddit.com'], root['yahoo']],
'values_changed': { "root['(direct)']['bounce_rate']": { 'new_value': 43.265798602382986,
'old_value': 43.71677762295505},
"root['Partners']['bounce_rate']": { 'new_value': 52.348993288590606,
'old_value': 58.888076079005124},
...Great, the results are more useful now.
significant-digits
Some of these numbers are too close to each other. Maybe we don’t care if the bounce rate of (direct) changed from 43.71677762295505 to 43.265798602382986:
"root['(direct)']['bounce_rate']": {
    'new_value': 43.265798602382986,
    'old_value': 43.71677762295505}
But we care about Partners bounce rate changing almost 6%:
"root['Partners']['bounce_rate']": {
    'new_value': 52.348993288590606,
    'old_value': 58.888076079005124}
DeepDiff provides the significant-digits and also the new Math Epsilon features to solve this problem.
$ deep diff google_store_bounce_rate_2017_04.csv google_store_bounce_rate_2017_07.csv
--group-by source --significant-digits 0 --number-format-notation e
--exclude-regex-paths total_visits --exclude-regex-paths total_no_of_bounces
{ 'dictionary_item_added': [root['sites.google.com'], root['dfa'], root['facebook.com']],
'dictionary_item_removed': [root['reddit.com'], root['t.co'], root['yahoo']],
'values_changed': { "root['Partners']['bounce_rate']": { 'new_value': 52.348993288590606,
'old_value': 58.888076079005124},
"root['google.com']['']": { 'new_value': 6,
'old_value': 7},
"root['google.com']['bounce_rate']": { 'new_value': 49.72826086956522,
'old_value': 43.90243902439025},
"root['m.facebook.com']['']": { 'new_value': 5,
'old_value': 6}}}Great, we see only the most important changes. Google.com’s rank has changed from 7 to 6 in one month, the partners bounce rate has decreased 6% and m.facebook.com has improved in rank too!
significant-digits behind the scene
In order to understand how significant-digits work, we need to take a look at the number_to_string function.
Remember the (direct) bounce rate that was removed when we used --significant-digits 0 --number-format-notation e:
"root['(direct)']['bounce_rate']": {
    'new_value': 43.265798602382986,
    'old_value': 43.71677762295505}
>>> from deepdiff.helper import number_to_string
>>> number_to_string(43.265798602382986, significant_digits=1)
'43.3'
>>> number_to_string(43.265798602382986, significant_digits=0)
'43'
>>> number_to_string(43.71677762295505, significant_digits=1)
'43.7'
>>> number_to_string(43.71677762295505, significant_digits=0)
'44'This function converts numbers into strings and “rounds” them based on the significant_digits that were passed. The significant_digits are the digits after the decimal point.
Note that with significant_digits=0, the 2 floating point numbers for (direct) bounce rate were rounded to 43 and 44 which means DeepDiff would have reported them in the diff results.
significant-digits + number-format-notation
That’s where the number-format-notation comes to play.
"root['(direct)']['bounce_rate']": {
    'new_value': 43.265798602382986,
    'old_value': 43.71677762295505}
>>> number_to_string(43.71677762295505, significant_digits=1)
'43.7'
>>> number_to_string(43.71677762295505, significant_digits=0,
number_format_notation='e')
'4e+1'
>>> number_to_string(43.71677762295505, significant_digits=1,
number_format_notation='e')
'4.4e+1'By switching to the number_format_notation='e' we are switching to the “scientific notation”. And by setting the significant_digits=0, number_format_notation='e' we are removing 43.265798602382986 vs. 43.71677762295505 from the diff results:
$ deep diff google_store_bounce_rate_2017_04.csv google_store_bounce_rate_2017_07.csv
--group-by source --significant-digits 0 --number-format-notation e
--exclude-regex-paths total_visits --exclude-regex-paths total_no_of_bounces
{ 'dictionary_item_added': [root['sites.google.com'], root['dfa'], root['facebook.com']],
'dictionary_item_removed': [root['reddit.com'], root['t.co'], root['yahoo']],
'values_changed': { "root['Partners']['bounce_rate']": { 'new_value': 52.348993288590606,
'old_value': 58.888076079005124},
"root['google.com']['']": { 'new_value': 6,
'old_value': 7},
"root['google.com']['bounce_rate']": { 'new_value': 49.72826086956522,
'old_value': 43.90243902439025},
"root['m.facebook.com']['']": { 'new_value': 5,
'old_value': 6}}}Which months are the most similar?
Now that we know how to diff the files to get the results we need, let’s ask ourselves the next interesting questions. Which months are the most similar?
DeepDiff provides a solution to this question via Deep Distance
Deep Distance is the distance between 2 objects. It is a floating point number between 0 and 1. Deep Distance in concept is inspired by Levenshtein Edit Distance.
At its core, the Deep Distance is the number of operations needed to convert one object to the other divided by the sum of the sizes of the 2 objects capped at 1. Note that unlike Levensthtein Distance, the Deep Distance is based on the number of operations and NOT the “minimum” number of operations to convert one object to the other. The number is highly dependent on the granularity of the diff results. And the granularity is controlled by the parameters passed to DeepDiff.
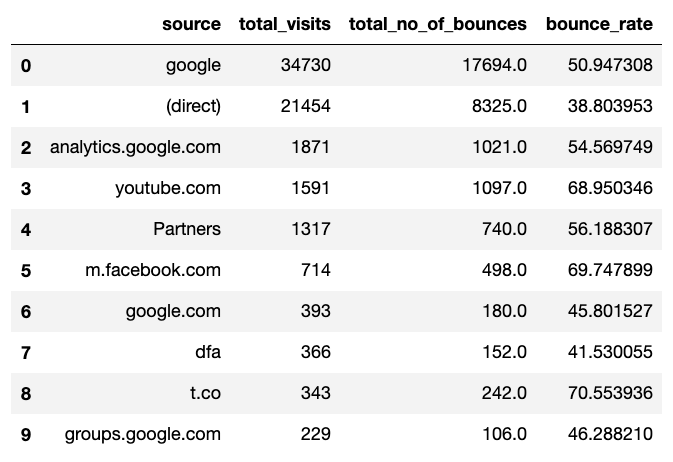
The deep diff commandline gives you the deep distance when you pass the --get-deep-distance flag. For example let’s get the deep distance between months 4 and 7:
$ deep diff google_store_bounce_rate_2017_04.csv google_store_bounce_rate_2017_07.csv
--group-by source --significant-digits 0 --number-format-notation e
--exclude-regex-paths total_visits --exclude-regex-paths total_no_of_bounces
--get-deep-distance
{ 'deep_distance': 0.16831683168316833,
'dictionary_item_added': [root['facebook.com'], root['dfa'], root['sites.google.com']],
'dictionary_item_removed': [root['reddit.com'], root['t.co'], root['yahoo']],
'values_changed': { "root['Partners']['bounce_rate']": { 'new_value': 52.348993288590606,
'old_value': 58.888076079005124},
"root['google.com']['']": { 'new_value': 6,
'old_value': 7},
"root['google.com']['bounce_rate']": { 'new_value': 49.72826086956522,
'old_value': 43.90243902439025},
"root['m.facebook.com']['']": { 'new_value': 5,
'old_value': 6}}}month 04 distance from month 07 is 0.168
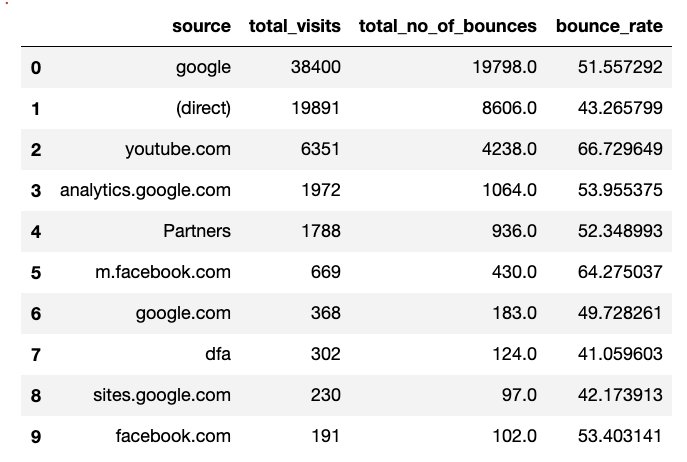
What about month 05 from 07?
$ deep diff google_store_bounce_rate_2017_05.csv google_store_bounce_rate_2017_07.csv
--group-by source --significant-digits 0 --number-format-notation e
--exclude-regex-paths total_visits --exclude-regex-paths total_no_of_bounces
--get-deep-distance
{ 'deep_distance': 0.1188118811881188,
'dictionary_item_added': [root['facebook.com'], root['sites.google.com']],
'dictionary_item_removed': [root['groups.google.com'], root['t.co']],
'values_changed': { "root['Partners']['bounce_rate']": { 'new_value': 52.348993288590606,
'old_value': 56.18830675778283},
"root['analytics.google.com']['']": { 'new_value': 3,
'old_value': 2},
"root['m.facebook.com']['bounce_rate']": { 'new_value': 64.27503736920778,
'old_value': 69.74789915966386},
"root['youtube.com']['']": { 'new_value': 2,
'old_value': 3}}}month 05 distance from month 07 is 0.118
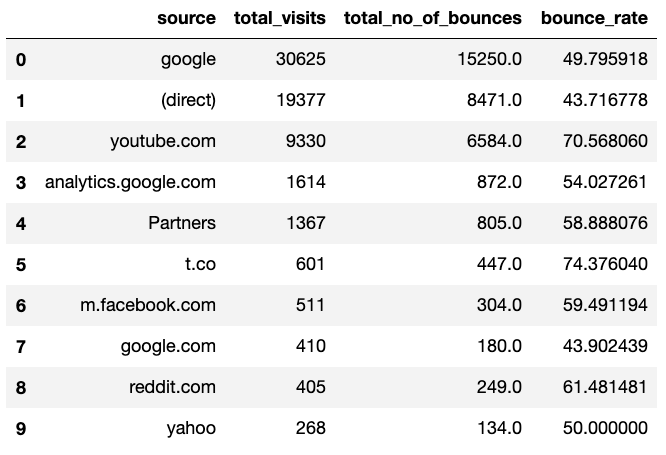
And month 06 from 07?
$ deep diff google_store_bounce_rate_2017_06.csv google_store_bounce_rate_2017_07.csv
--group-by source --significant-digits 0 --number-format-notation e
--exclude-regex-paths total_visits --exclude-regex-paths total_no_of_bounces
--get-deep-distance
{ 'deep_distance': 0.08415841584158416,
'dictionary_item_added': [root['facebook.com']],
'dictionary_item_removed': [root['baidu']],
'values_changed': { "root['(direct)']['']": {'new_value': 1, 'old_value': 0},
"root['(direct)']['bounce_rate']": { 'new_value': 43.265798602382986,
'old_value': 46.51783094609373},
"root['Partners']['bounce_rate']": { 'new_value': 52.348993288590606,
'old_value': 61.23381568926123},
"root['analytics.google.com']['bounce_rate']": { 'new_value': 53.9553752535497,
'old_value': 57.738435179897195},
"root['google']['']": {'new_value': 0, 'old_value': 1},
"root['google.com']['']": { 'new_value': 6,
'old_value': 5},
"root['m.facebook.com']['']": { 'new_value': 5,
'old_value': 6}}}month 06 distance from month 07 is 0.084
So the most similar month to 07 is the month before it!
Example 2
Let’s take a look at another sample data. We have the following csv files:
t1.csv
| first_name | last_name | zip |
|---|---|---|
| Joe | Nobody | 90011 |
| Jimmy | Brown | 90007 |
| Sara | Smith | 90007 |
t2.csv
| first_name | last_name | zip |
|---|---|---|
| Joe | Nobody | 90011 |
| Jimmy | Brown | 90404 |
| Sara | Smith | 90007 |
$ deep diff t1.csv t2.csv
{ 'values_changed': { "root[1]['zip']": { 'new_value': '90404',
                                          'old_value': '90007'}}}
As you can see here, Jimmy has moved from downtown LA (90007) to Santa Monica (90404).
Let’s take a look at t3.csv now:
| first_name | last_name | zip |
|---|---|---|
| Joe | Nobody | 90011 |
| Sara | Smith | 90007 |
| Jimmy | Brown | 90404 |
When we run the diff command:
$ deep diff t1.csv t3.csv
{ 'values_changed': { "root[1]['first_name']": { 'new_value': 'Sara',
                                                 'old_value': 'Jimmy'},
                      "root[1]['last_name']": { 'new_value': 'Smith',
                                                'old_value': 'Brown'},
                      "root[1]['zip']": { 'new_value': '90007',
                                          'old_value': '90007'},
                      "root[2]['first_name']": { 'new_value': 'Jimmy',
                                                 'old_value': 'Sara'},
                      "root[2]['last_name']": { 'new_value': 'Brown',
                                                'old_value': 'Smith'},
                      "root[2]['zip']": { 'new_value': '90404',
                                          'old_value': '90007'}}}
The results don’t look very useful. It has literally compared the rows line by line.
Ignore Order
Perhaps if we don’t care about the order of the rows we can get more useful results? We can do that by passing --ignore-order.
$ deep diff t1.csv t3.csv --ignore-order
{ 'values_changed': { "root[1]['zip']": { 'new_value': '90404',
                                          'old_value': '90007'}}}
Repeats and ignore order
Here we have a repeated line in t4.csv
| first_name | last_name | zip |
|---|---|---|
| Joe | Nobody | 90011 |
| Jimmy | Brown | 90404 |
| Sara | Smith | 90007 |
| Jimmy | Brown | 90404 |
Note that the repeat won’t make it into the diff results when passing --ignore-order.
$ deep diff t1.csv t4.csv --ignore-order
{ 'values_changed': { "root[1]['zip']": { 'new_value': '90404',
                                          'old_value': '90007'}}}
Patch
DeepDiff allows you to create “patches” just like Linux patch command. Note that the commandline “patch” is only a subset of what DeepDiff’s Delta’s Python API provides.
We create the patch by passing --create-patch. Also since we are ignoring the order of the rows, we need to pass --report-repetition to makes sure the repetitions are part of the “diff” results in the patch.
$ deep diff t1.csv t4.csv --ignore-order --report-repetition --create-patch > patch1Remember that the diff between those 2 files was that row one’s zip has changed to 90404.
As an example let’s have t1new.csv
| first_name | last_name | zip |
|---|---|---|
| Joe | Nobody | 90011 |
| Jimmy | Brown | 90007 |
| Sara | Smith | 90007 |
| John | Doe | 90001 |
| Max | Foo | 23232 |
Let’s create one more patch file!
$ deep diff t1.csv t1new.csv --ignore-order --report-repetition --create-patch > patch2So we have:
- patch1 is the delta of t1.csv and t4.csv
- patch2 is the delta of t1.csv and t1new.csv
Applying the patches
The deep patch command has a very similar interface to Linux’s patch command:
$ deep patch t1new.csv patch1 --backup| first_name | last_name | zip |
|---|---|---|
| Joe | Nobody | 90011 |
| Jimmy | Brown | 90404 |
| Sara | Smith | 90007 |
| John | Doe | 90001 |
| Max | Foo | 23232 |
Awesome, it updated Jimmy’s zip code to be 90404 in this t1new.csv file.
We can reuse the same patch file on t1:
$ deep patch t1.csv patch1 --backupt1.csv after applying patch1: Jimmy’s zipcode in this file is updated too!
| first_name | last_name | zip |
|---|---|---|
| Joe | Nobody | 90011 |
| Jimmy | Brown | 90404 |
| Sara | Smith | 90007 |
$ deep patch t1.csv patch2 --backupt1.csv is now effectively the same as t1new.csv!
| first_name | last_name | zip |
|---|---|---|
| Joe | Nobody | 90011 |
| Jimmy | Brown | 90404 |
| Sara | Smith | 90007 |
| John | Doe | 90001 |
| Max | Foo | 23232 |
Patches can be applied to any objects!
some.yaml
---

-
    first_name: Joe
    last_name: Nobody
    address: 3232 Main st.
    phone: 323-123-2345
    zip: 90011
-
    first_name: Jimmy
    last_name: Brown
    address: 11th There sq.
    phone: 111-123-9911
    zip: 90002
-
    first_name: Sara
    last_name: Smith
    address: Downtown LA
    phone: 818-113-2005
    zip: 90007
Yes we can patch this yaml file from the patch file we made between 2 csv files!
$ deep patch some.yaml patch1 --backup
- address: 3232 Main st.
  first_name: Joe
  last_name: Nobody
  phone: 323-123-2345
  zip: 90011
- address: 11th There sq.
  first_name: Jimmy
  last_name: Brown
  phone: 111-123-9911
  zip: 90404
- address: Downtown LA
  first_name: Sara
  last_name: Smith
  phone: 818-113-2005
  zip: 90007
As you can see the formatting of the yaml file is changed. This is due to the fact that DeepDiff loads the file into a Python dictionary, modifies it and then writes it back to disk. During this operation, the file loses its original formatting.
$ deep patch some.yaml patch2 --backup
The patch2 adds new lines to the yaml file:
- address: 3232 Main st.
  first_name: Joe
  last_name: Nobody
  phone: 323-123-2345
  zip: 90011
- address: 11th There sq.
  first_name: Jimmy
  last_name: Brown
  phone: 111-123-9911
  zip: 90404
- address: Downtown LA
  first_name: Sara
  last_name: Smith
  phone: 818-113-2005
  zip: 90007
- first_name: John
  last_name: Doe
  zip: '90001'
- first_name: Max
  last_name: Foo
  zip: '23232'
What about applying to a python object?
As noted, the deep patch command is the commandline interface for what DeepDiff calls Delta.
from deepdiff import DeepDiff, Delta


class CustomClass:
    def __init__(self, a, b=None):
        self.a = a
        self.b = b

    def __str__(self):
        return "Custom({}, {})".format(self.a, self.b)
    __repr__ = __str__

t1 = CustomClass(a=10, b=10)
t2 = CustomClass(a=10, b=12)
The Delta object can be applied to Python objects:
>>> diff = DeepDiff(t1, t2)
>>>
>>> delta = Delta(diff)
>>>
>>> t1
Custom(10, 10)
>>> t2
Custom(10, 12)
>>> t3 = t1 + delta
>>> t3
Custom(10, 12)
The “patch” files are essentially Delta dictionaries that are serialized via Python’s pickle. You can apply those patches to any objects! From python built-in types to custom classes, Numpy arrays and more. The commandline interface let’s you create and use patch from csv, json, toml, yaml and pickle files!
Looking for something in the file?
The deep grep is used to grep through the files. For example let’s look for sara in the above yaml file:
$ deep grep sara some.yaml -i
{'matched_values': ["root[2]['first_name']"]}
We get the exact path to the item[s] that have sara in them instead of just the line number[s]!
Extracting a value of a path?
The deep extract allows you to extract values from path’s in a file:
$ deep grep sara some.yaml -i
{'matched_values': ["root[2]['first_name']"]}

$ deep extract "root[2]" some.yaml
{ 'address': 'Downtown LA',
  'first_name': 'Sara',
  'last_name': 'Smith',
  'phone': '818-113-2005',
  'zip': 90007}
Conclusion
The new commandline interface to DeepDiff provides more accessible ways to directly deal with files from within the shell:
- DeepDiff
$ deep diff --help
- Delta
$ deep patch --help
- grep
$ deep grep --help
- extract
$ deep extract --help
Hope you will enjoy using the deep commandline!
Sep Dehpour